Switching your AWS Elastic Beanstalk site to https

Why does https matter?

If you have a website that involves any personal information (including passwords), you should be securing your site with https. Even if you're not interested in your users' data, there are pragmatic reasons to use http; Google's going to start labeling non-https domains as "unsecured". So, avoid that label and use https!

Let's Encrypt! was one of the first to offer free SSL certificates to anyone; if you host on Amazon Web Services via Elastic Beanstalk you can't easily install one of their certificates, but you still can install a free certificate.

Below I'll show you how to: get a free SSL certificate from AWS Certificate Manager, connect that certificate to your site hosted on AWS Elastic Beanstalk, and automatically route regular, unsecured http traffic to your new https address(es).

The steps we will go through are as follows:

  1. Get an SSL certificate for your site
  2. Modify one of the .config files in your .ebextensions folder
  3. Update your settings to switch to https
  4. Push your changes to master

1. Get an SSL certificate for your site

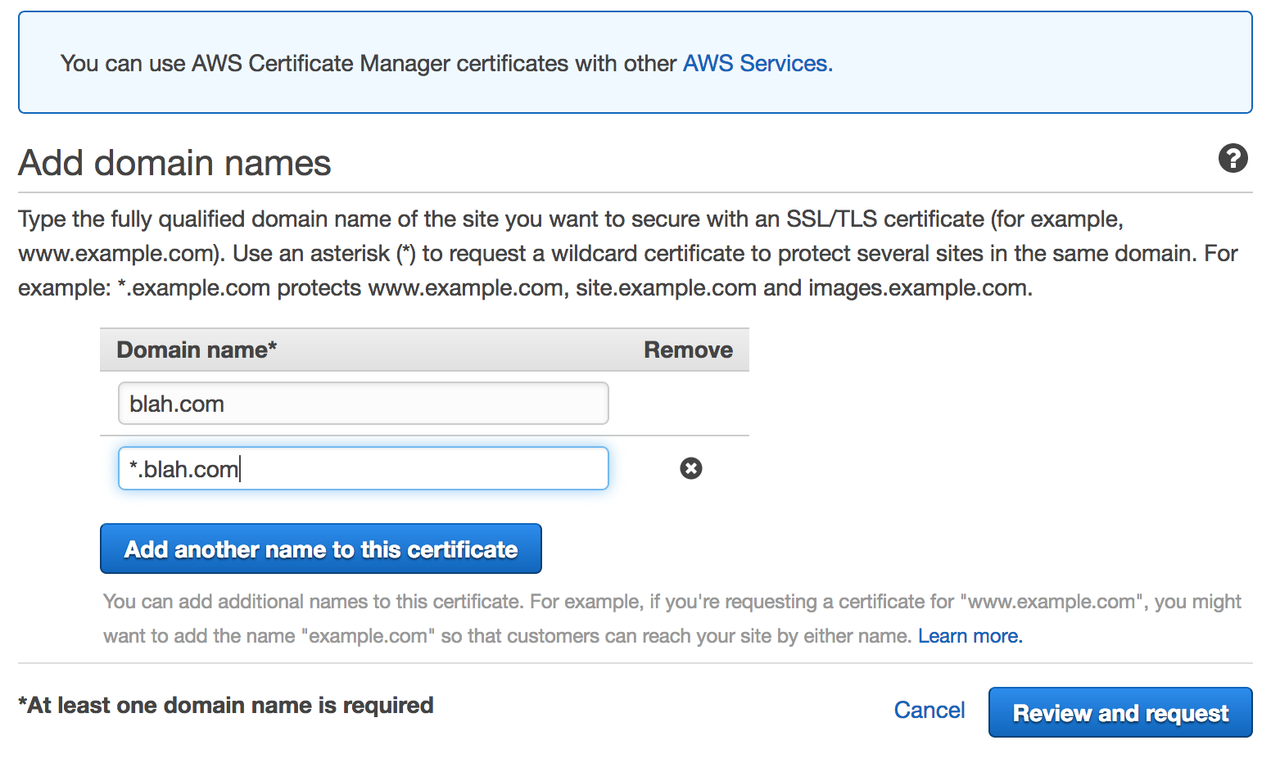
AWS Certificate Manager issues free certificates, and is straightforward to use. You (a) specify what domain (and subdomains) you want a certificate for, (b) submit your request, and then (c) click through a confirmation link that will be emailed to you.

IMPORTANT Keep in mind that *.blah.com will resolve to https://blog.blah.com and https://www.blah.com, but not https://blah.com, so after entering your domain name, be sure to click on "Add another name to this certificate" and include your plain domain name (e.g. blah.com)

request your ssl cert

After clicking on Review and Request you will come to another page where you review the domain name for which you've requested a certificate and submit your request. AWS sends an email to the admin email address for your domain. The message contains a link that lets you verify that you do indeed want the certificate issued. Once you've verified it, it's time to make changes to some code.

2. Update one of your .config files to redirect all traffic to SSL

Elastic Beanstalk deployments are customized by .config files in the .ebextensions folder in your project's root directory. To deploy my site I followed RealPython's excellent guide to deployment on Elastic Beanstalk, which left me with two files in my .ebextensions folder: 01_packages.config and 02_python.config. Without making changes to your .config, your site will not redirect http connections to https; instead, it will allow both types. Thanks to this StackOverflow post, we can copy and paste code into one of these .config files to redirect http traffic to https.

My original 01_packages.config looked like this:

packages:
  yum:
    git: []
    postgresql93-devel: []
    libjpeg-turbo-devel: []

I edited 01_packages.config to look like this:

packages:
  yum:
    git: []
    postgresql93-devel: []
    libjpeg-turbo-devel: []

files:
    "/etc/httpd/conf.d/ssl_rewrite.conf":
        mode: "000644"
        owner: root
        group: root
        content: |
            RewriteEngine On
            <If "-n '%{HTTP:X-Forwarded-Proto}' && %{HTTP:X-Forwarded-Proto} != 'https'">
            RewriteRule (.*) https://%{HTTP_HOST}%{REQUEST_URI} [R,L]
            </If>

Now commit your changes, but don't eb deploy just yet...you haven't configured your load balancer to accept https traffic!

3. Update your settings

Now we need to turn on https listening. If we don't do this, your site won't know that it should be looking for traffic to SSL endpoints.

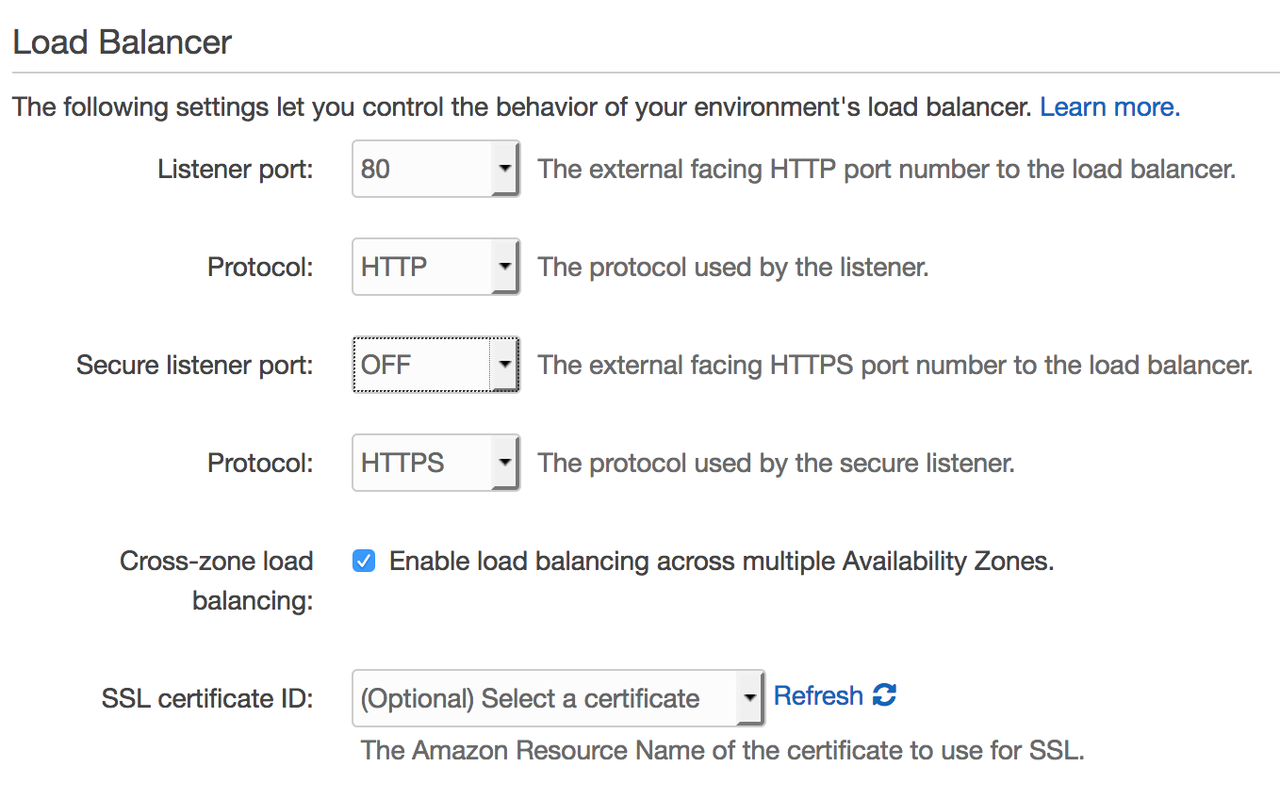
In your Elastic Beanstalk application's AWS console, open the Confirguration window, scroll down to Network Tier, and open the Load Balancing settings. You'll see something like this:

Elastic Beanstalk settings default

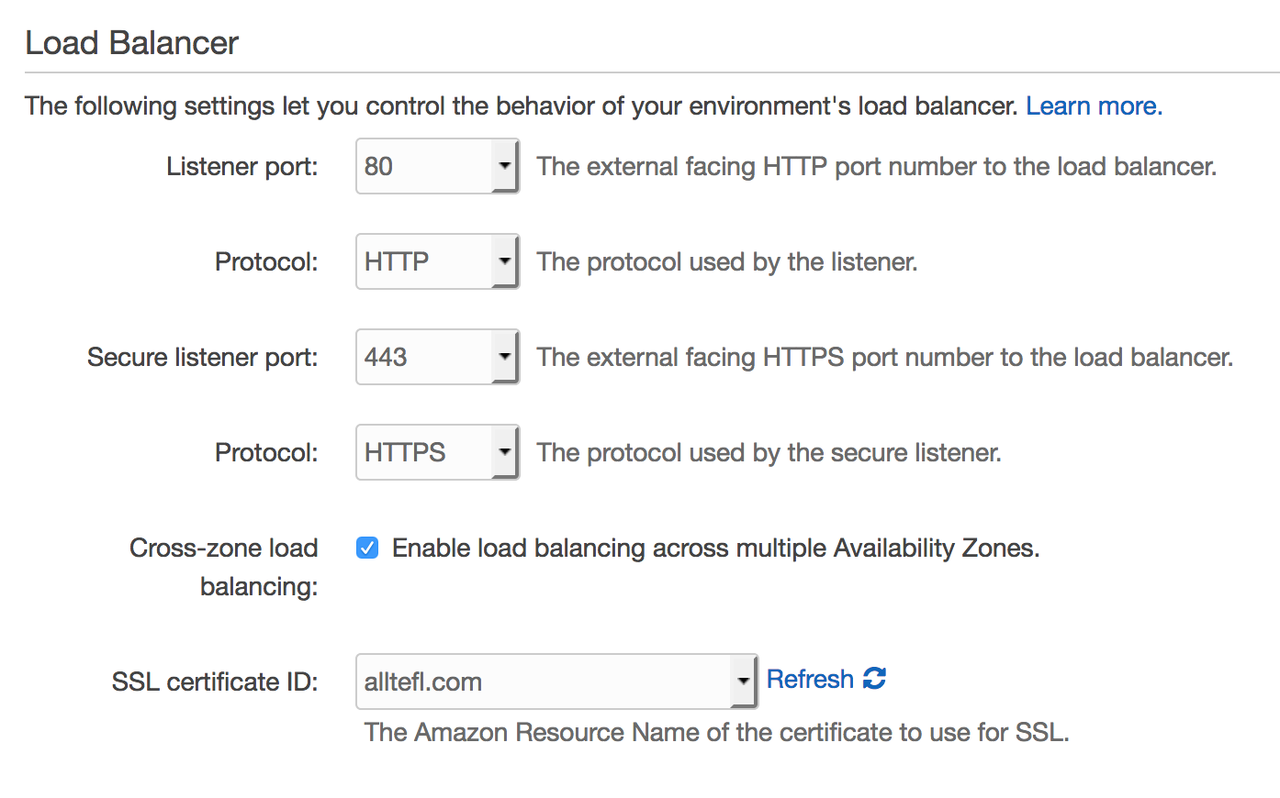
Under the Load Balancer section, change the Secure Listener Port from Off to 443, and select your SSL Certificate ID. It should look like this:

Elastic Beanstalk settings changed

It's important that you leave the regular Listener Port on. If you turn in off, users must type in https:// before your URL to get to your site. So, don't touch those options.

4. Deploy your updated code & bask in your secured connection

Now, hop over to your terminal window and with a quick eb deploy you will push your changes.

Enjoy

That's it. You've now got a site that's https by default and didn't cost you a penny more. Got suggestions on how to improve this process? Hit me up on twitter.

AWS Lambda TypeError - "x() takes no arguments (2 given)"

I guess I didn't read the documentation thoroughly enough. (Actually, I hadn't read it at all.)

I had some wonderful code that worked on my local machine. I was excited to see it up and running on AWS Lambda (especially since Lambda is free...) but when I tried to run the script, it constantly threw the following error on AWS Lambda:

{
  "stackTrace": [
    [
      "/var/runtime/awslambda/bootstrap.py",
      246,
      "handle_event_request",
      "result = request_handler(json_input, context)"
    ]
  ],
  "errorType": "TypeError",
  "errorMessage": "tweeter() takes no arguments (2 given)"
}

What could it mean?

When you deploy a Python script to Lambda, you need to change your script's main function (the _handler_, in AWS-speak) to accept the parameters (event, context). These parameters pass in event data and runtime information to the function.

Problem solved.

Finding a Majority Element in Python 3

Doing more data structure work; asked to find if an array of numbers has a majority element – that is, an element that appears more than 50% of the time in the array.

My assignment is to write a greedy algorithm to do this…but wouldn't it be easier to just use the collections module?

from collections import Counter

def majority_element_finder(numbers):
    return Counter(numbers).most_common()[0][1] > (len(numbers) // 2)

The most_common([n]) returns a list of tuples of the elements in numbers along with the number of times each appears. This is listed in decreasing order. We want to take the first element's ([0]) count ('[1]'), and see if it's greater than half the length of the list.

Thoughts after my first codjo

As part of RC Start, the Recurse Center's mentoring program for new(-ish) programmers, I've started taking part in their "codjo" pair programming challenges. The way it works is that you are given a partner and a puzzle to work on.

A few thoughts about it:

Technology gets in the way

Biggest hurdle in getting it done? Figuring out our technology stack for screen sharing. ScreenHero wouldn't let my partner register, even though she had a valid invite. Then it took a while to get Google Hangouts audio working. We spent way too much time getting technology to work…but that seems to be quite a bit of doing development, too.

Remote pair programming forces you to think clearly

We used a driver/navigator system. My partner navigated (said what to do) and I drove (typed the code).

It was important to choose good variable names and write code that we both could understand. Talking things out and getting and giving immediate feedback on how code read felt transformative, in a way. In the past I'd been fearful of going over my code with people (I'd had some bad experiences), but getting to do it in a collaborative, non-judgmental setting was fantastic.

It's great to have all your tools together

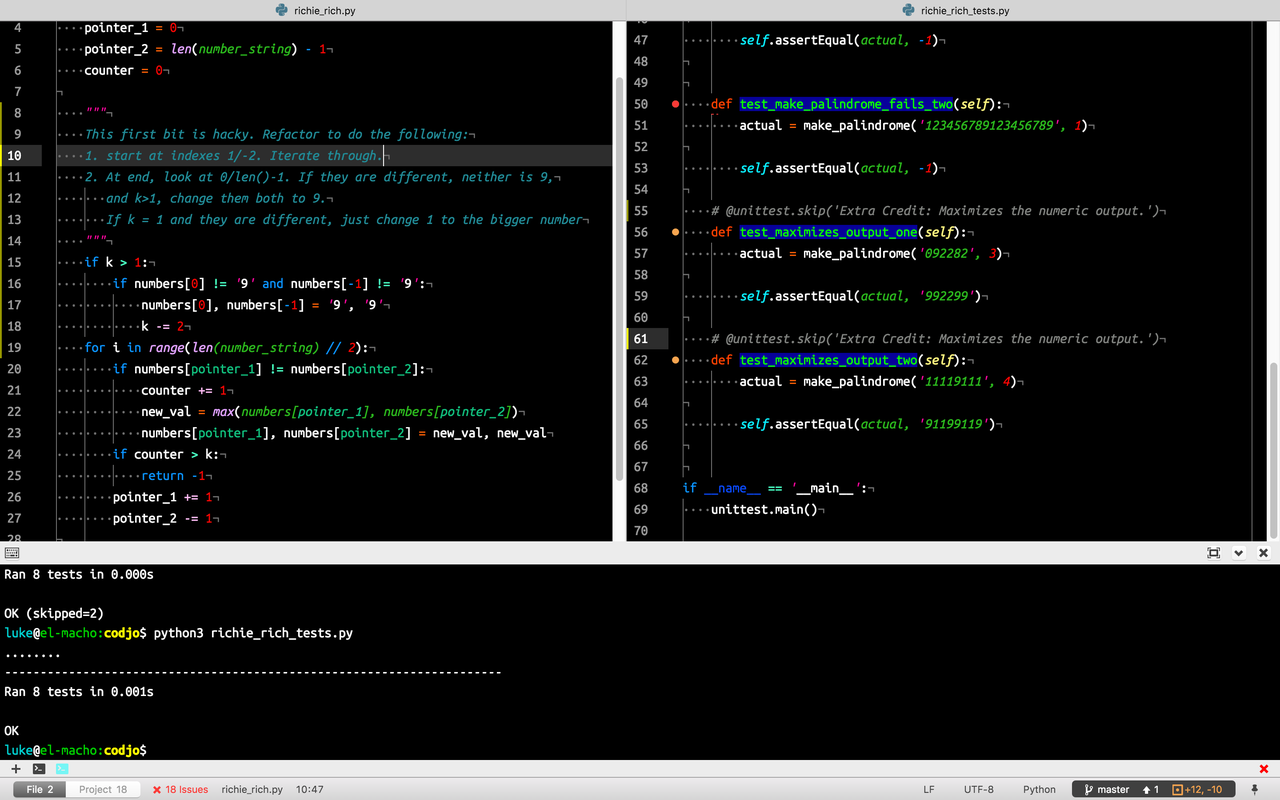
My dev environment - Atom, terminal-plus, Neon Color Scheme

While working on the puzzle I was using Atom along with the terminal-plus plugin. This meant my partner and I could run tests and try out code snippets in IPython without having to leave the environment. Super useful. Of course, it also could be super embarrassing, like when I realized my machine's name was out there for the world to see. (It's from The Onion)

Group code reviews are scary but fun

After we finished and submitted our solution there was a group code review. Three groups shared and explained their code. Seeing how other people approached the problem was very helpful – something I love about coding is that you're always able to learn from the code you read. Having the authors explain their thinking and then getting a review of the code from an experienced developer made it even easier to learn.

In summation

Do pair programming. It's worth it.

Rounding decimals in Python (or: Why doesn't .5 round to 1?)

Doing my morning Hacker Rank puzzle this morning, I discovered Python 3 doesn't round numbers ending in .5 the way I'd expect:

int(12.5)
>>> 12
int(13.5)
>>> 14
round(12.5)
>>> 12
round(13.5)
>>> 14

As always, Stack Overflow had the answer: Python rounds .5 down sometimes because of Banker's Rounding, also known by the much more informative name "Round Half To Even". Python will round .5 numbers to the nearest even whole.

In the problem I was solving (giving a rounded total cost of a meal), this didn't work, so I had to use decimal.Decimal's quantize method to round up:

from decimal import Decimal

mc = float(input())  # these unpythonic variable names came from HackerRank
tp = int(input())
tax = int(input())

def totalCost(mc, tp, tax):
    total = Decimal(mc + (tp / 100 * float(mc)) + ((tax / 100 * float(mc)))).quantize(Decimal('1'))
    print("The total meal cost is {} dollars.".format(total))

totalCost(mc, tp, tax)

I'm over 80 characters in that line, so there's the potential for refactoring.

The difference between list.sort and sorted(list) in Python 3

The other week for my algorithms class I needed to find the minimum dot product of a list. My first try at a solution, which threw an error, was this:

def min_dot_product(a, b, n):
    a = sorted(a)
    b = sorted(b, reverse=True)
    res = 0
    for i in range(n):
        res += a[i] * b[i]
    return res

Python has two different ways of sorting a list: list.sort([reverse=False]) and sorted(list[, reverse=False]). Why a method and a function to do the same thing? Let's look:

li = [5, 1, 4, 3, 2]
li.sort()
li
>>> [1, 2, 3, 4, 5]
li.sort(reverse=True)
li
>>> [5, 4, 3, 2, 1]

list.sort() sorts the list and returns None.

On the other hand, sorted(list) sorts and returns the list

li = [5, 1, 4, 3, 2]
sorted(li, reverse=True)
>>> [5, 4, 3, 2, 1]

I've contributed the above to SO's Python documentation on lists and list methods.

Fun with Python 3's print function

Fun with the print function

Most Pythonistas learn early on that the print function can evaluate statements:

print(2>3)
>>> False
print(7+5==12)
>>> True

However, I didn't know that print can return different strings based upon whether or not the following statement is true or false. The format is:

print(['output for False', 'output for True']['statement_to_evaluate'])

For example:

print(['no', 'yes'][2 > 3])
>>> no

print(['Go back to math class', 'You know math!'][7 + 5 == 12])
>>> You know math!

Greedy Algorithms: Making Change

In this week's installment of my Coursera class on Algorithms, we've been introduced to "greedy" algorithms. One of the homework requires us to solve a tried and tested greedy problem: determining the least number of coins needed to change money.

My first answer to this question wasn't actually a greedy algorithm…but it was only one line:

def get_change(num):
    return (num % 5 + ((num - (num % 5)) % 10 // 5) + ((num - (num % 10)) // 10))

Which adds up the constituent ones, fives, and tens of the number. Here's the code on PythonTutor. While this code passed all the tests, it is neither readable nor greedy. So, back to the drawing board.

Next, I wrote a function that took two variables: the amount (num) and number of coins (coins):

def get_change(m, coins):

    while m:
        if m - 10 >= 0:
            m -= 10
            coins += 1
            return get_change(m, coins)
        if m - 5 >= 0:
            m -= 5
            coins += 1
            return get_change(m, coins)
        if m - 1 >= 0:
            m -= 1
            coins += 1
            return get_change(m, coins)

    return coins

Ho there, recursion! The program keeps calling itself, stating the amount of money (m) remaining and the number of coins each time. This also wound up being about twice as fast as my first version of the code: in the online grader, the first version of the code took .04 seconds, while the second iteration took just .02 seconds. Pretty good! Here's the code on PythonTutor; it takes 26 steps to find how many coins are needed to change six cents.

That's fine, but I wanted to see if I could do it without that second variable. And whaddayaknow, I could.

def get_change(m):

    coins = 0

    while m:
        while m - 10 >= 0:
            m -= 10
            coins += 1
        while m - 5 >= 0:
            m -= 5
            coins += 1
        while m - 1 >= 0:
            m -= 1
            coins += 1

    return coins

That just seems much cleaner and more readable, doesn't it? Looking at it on PythonTutor, it only takes 17 steps to solve get_change(6) – much more efficient than my second attempt! In the online grader this third iteration ran slightly more efficiently, using 4 MB less memory than the second iteration taking the same amount of time.

What I Would Do Next

Next steps for the above? If I were to come back to this assignment, I'd work to make the code reusable. Right now it is built to work with pennies, nickels, and dimes. It would be an idea to allow the user to enter an amount and a list of coin values that could be used to determine how many coins are needed to make change.

Chained geography lookups in Django with django-smart-selects and django-cities-light

Over the past months I've been working in my spare time on a Django based website, allTEFL, a sort of Glassdoor site for TEFL teachers. This was the project that first made me want to learn to program, and it is hugely exciting to see it come to life.

This is the first in a series of posts in which I'll describe how I designed and organized the site, then talk about some of the fun coding challenges I came across as I worked on it.

First we'll walk through some simple user stories, then talk about how use case scenarios affected how I created my models.

User Stories

At first, I figured that there would basically be three things that would happen:

  1. A Teacher creates an account so she can review a school (school_review) or a recruiter (recruiter_review).
  2. A Teacher adds a school_review to the database. This is publicly viewable as an anonymous post on the School's page.
  3. Specific data from the school_review (school name, dates of employment) is visible in the Teacher's resume_view.

Putting the Parts Together

Creating a Teacher model was easy; use Django's auth.User model. The School model has proven to be much more interesting.

The School

A Teacher has a one-to-many relationship with Schools that she's taught at and reviewed.

First, a complication: there is no complete list of all the English schools or TEFL recruiters in China. Thus, (2) above has a problem: the Teacher's School may not exist in the database. So let's revise my user stories:

  1. A Teacher adds a school_review for a School in the database.
  2. If the School is not in the database already, the Teacher adds it before reviewing it.

Cool. But as it turns out, doing this is a bit harder than it seemed at first glance.

Letting a user add Schools to the database is problematic because we don't want data to be fragmented. (One teacher might enter Beijing High School, but another teacher from the same school might look for BHS and then create a new instance of the School model.) So it's important to make finding your school's name as streamlined and precise as possible, reducing peoples' temptation to not look and just add a new school.

We could just add schools by name, but this is problematic because Schools may well share names. For example, there are a number of chain schools, similar to test prep behemoths Kaplan or Princeton Review in the US. We want to make sure Wall Street English in Wudaokou, Beijing is distinguishable from WSE in Zhongguancun, Beijing. Also, users will doubtless want to look up schools by location So, just having a list of schools organized by name is not an appropriate way to organize the db.

Chained Selects in Django

So, how about a chained lookup in our form. A chained lookup means finding all Y that belong to X. This will allow us to select schools (and enter them into the database) based on location. The user can select a Province, which brings up a list of all its City. After selecting the City, you can either (a) select your School or (b) add_school to the database if necessary.

Country -> Province List -> City List -> Schools
e.g.
China -> Jilin -> Changchun -> Sino-American Denver Foreign Language School

But to do this, I need a list of all the provinces (and their constituent cities) in a given country. That sounds like quite a bit of work to do by hand…so surely someone's automated it, right?

There are two Django packages that can be combined to (a) populate tables with country, province/state, and city data, and (b) make it easy to build geographic chained selections: django-cities-light and django-smart-selects. Below I will show you how to use the two together to create your own forms in Django that automatically whittle down information from the database to

For my use case it's been necessary to make custom models so I can have views for city, region, and city. Because of this, I need to use the abstract models included in cities_light.

#models.py

from cities_light.abstract_models import AbstractCountry, AbstractRegion, AbstractCity

These are our necessary imports. First, we are using the generic models from django-cities-light: Country, Region, and City.

IMPORTANT There is a known bug in django-cities-light's abstract models that requires you to declare your models in the same order that you imported the Abstract models.

from cities_light.abstract_models import AbstractCountry, AbstractRegion, AbstractCity
from cities_light.receivers import connect_default_signals


#models.py

class Country(AbstractCountry):

    pass
connect_default_signals(Country)


class Region(AbstractRegion):

    pass
connect_default_signals(Region)


class City(AbstractCity):

    pass
connect_default_signals(City)

We need to register our custom models in the site's settings.py:

# settings.py

CITIES_LIGHT_TRANSLATION_LANGUAGES = ['zh', 'en'] # I want to include both Chinese & English names
CITIES_LIGHT_INCLUDE_COUNTRIES = ['CN'] # Download geographic information for China.
CITIES_LIGHT_APP_NAME = 'app_name' # Let the app know that I have custom models, defined in this app.

From the terminal we now need to run ./manage.py cities_light to populate the tables. Three tables will be created: country, region, and city. The tables have a bunch of columns in them. The most important are:

country

id name_ascii slug
1 China china

region

Header One Header Two
Item One Item Two
id name_ascii slug display_name country_id
2 Qinghai qinghai Qinghai, China Foreign Key

Worth noting that this model has a foreign key, country_id, that associates with a country.

city

id name_ascii slug display_name country_id region_id
1 Rikaze rikaze Rikaze, Tibet Autonomous Region, China ForeignKey(country_id) ForeignKey(region_id)

Two foreign keys here - country_id and region_id.

The tables include multiple versions of the location's name. I've found name_ascii and display_name to be the two most useful. THe latter includes province and country.

Linking to City/Province/Country views

Our existing models are nice, but I want to be able to link to views for each of these models. This means writing a get_absolute_url function for them in my models, adding URL patterns to urls.py, and adding views for each.

    # models.py
    class Country(AbstractCountry):

        def get_absolute_url(self):
            return reverse('country_school_list',
                           kwargs={'country_slug': self.slug})

    connect_default_signals(Country)


    class Region(AbstractRegion):

        def get_absolute_url(self):
            return reverse('province_school_list',
                           kwargs={'country_slug': self.country.slug,
                                   'province_slug': self.slug})

    connect_default_signals(Region)


    class City(AbstractCity):

        def get_absolute_url(self):
            return reverse('city_school_list',
                           kwargs={'country_slug': self.country.slug,
                                   'province_slug': self.region.slug,
                                   'city_slug': self.slug})

    connect_default_signals(City)


    # urls.py

        url(r'^schools/(?P<country_slug>[\w-]+)/$',
            CountrySchoolList.as_view(),
            name='country_school_list'),
        url(r'^schools/(?P<country_slug>[\w-]+)/(?P<province_slug>[\w-]+)/$',
            ProvinceSchoolList.as_view(),
            name='province_school_list'),
        url(r'^schools/(?P<country_slug>[\w-]+)/(?P<province_slug>[\w-]+)/(?P<city_slug>[\w-]+)/$',
            CitySchoolList.as_view(),
            name='city_school_list'),


    # views.py

    from django.views.generic import ListView, DetailView, CreateView
    from .models import School, Country, Region, City


    class CountrySchoolList(ListView):

        model = School
        template_name = "school_reviews/school_list.html"
        ordering = ('school_province', 'school_city', 'school_name')

        def get_queryset(self, **kwargs):
            self.country = get_object_or_404(Country, slug=self.kwargs['country_slug'])
            return School.objects.filter(school_country=self.country)

        def get_context_data(self, **kwargs):
            context = super(CountrySchoolList, self).get_context_data(**kwargs)
            context['section'] = 'country'
            return context


    class ProvinceSchoolList(ListView):

        model = School
        template_name = "school_reviews/school_list.html"
        ordering = ('school_city', 'school_name')

        def get_queryset(self, **kwargs):
            self.country = get_object_or_404(Country, slug=self.kwargs['country_slug'])
            self.province = get_object_or_404(Region, slug=self.kwargs['province_slug'])
            return School.objects.filter(school_country=self.country,
                                         school_province=self.province)

        def get_context_data(self, **kwargs):
            context = super(ProvinceSchoolList, self).get_context_data(**kwargs)
            context['section'] = 'province'
            return context


    class CitySchoolList(ListView):

        model = School
        template_name = "school_reviews/school_list.html"
        ordering = ('school_name')

        def places(self, **kwargs):
            country = get_object_or_404(Country, slug=self.kwargs['country_slug'])
            province = get_object_or_404(Region, slug=self.kwargs['province_slug'])
            city = get_object_or_404(City, slug=self.kwargs['city_slug'])
            return country, province, city

        def get_queryset(self, **kwargs):
            self.country = get_object_or_404(Country, slug=self.kwargs['country_slug'])
            self.province = get_object_or_404(Region, slug=self.kwargs['province_slug'])
            self.city = get_object_or_404(City, slug=self.kwargs['city_slug'])
            return School.objects.filter(school_country=self.country,
                                         school_province=self.province,
                                         school_city=self.city)

        def get_context_data(self, **kwargs):
            context = super(CitySchoolList, self).get_context_data(**kwargs)
            context['section'] = 'city'
            context['country'] = get_object_or_404(Country, slug=self.kwargs['country_slug'])
            return context

Smart Selects

The last thing we need to do is write our models incorporating the ChainedForeignKey that django-smart-selects provides. Keep in mind that the chained_field is the name in your model, while the chained_model_field is the name in your database. My names aren't the same since I used django-cities-light to populate the db.

# models.py
class School(models.Model):

    school_name = models.CharField(blank=False, max_length=200, unique=True)
    slug = models.SlugField(unique=True)
    school_country = models.ForeignKey(Country)
    school_province = ChainedForeignKey(
        Region,
        chained_field="school_country",
        chained_model_field="country",
        help_text="The school's province."
    )
    school_city = ChainedForeignKey(
        City,
        chained_field='school_province',
        chained_model_field='region',
        show_all=False,
        help_text="The school's city."
    )

    def save(self, *args, **kwargs):
        self.slug = slugify(self.school_name)
        super(School, self).save(*args, **kwargs)

    def __str__(self):
        return self.school_name

    class Meta:
        ordering = ('school_country', 'school_province', 'school_city', 'school_name')

And there you have it. A Django model that relies upon chained selections of geographic data that have been auto-populated to your database.